
Arduino NodeMCU ESP8266 controlled by Amazon alexa YouTube
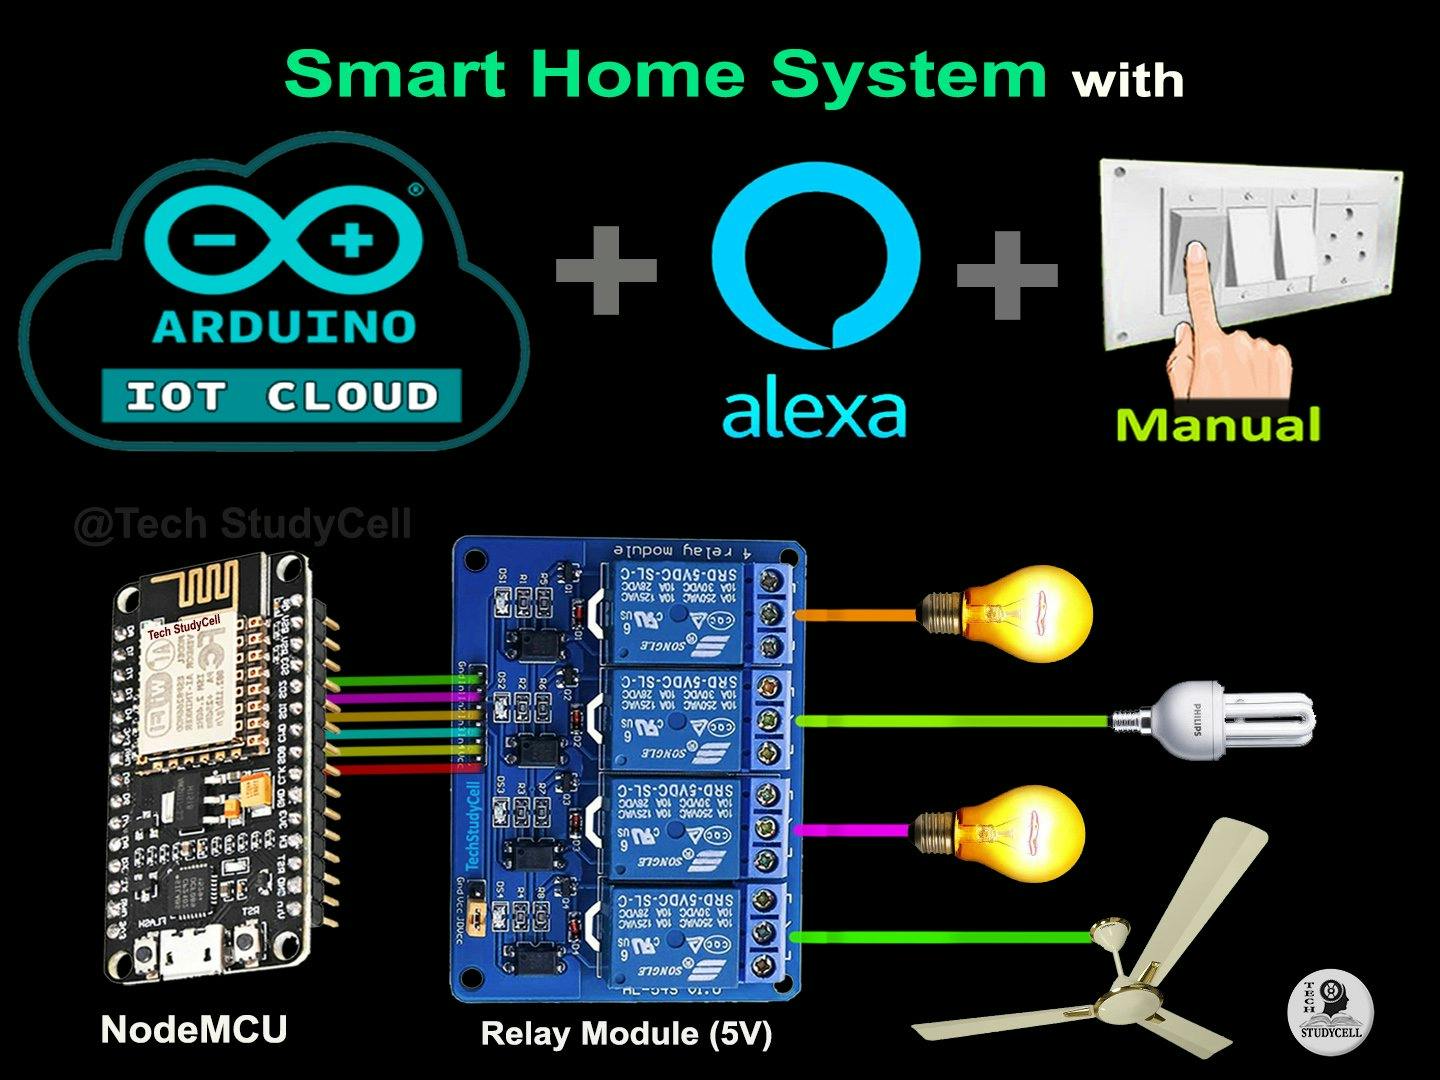
June 9, 2021 ESP8266 Projects 14 Comments In this Arduino IoT cloud project, I have explained how to make Arduino IoT Cloud ESP8266 NodeMCU Alexa Home Automation system. With this NodeMCU ESP8266 project, you can control 4 home appliances with Arduino IoT Cloud dashboard, Alexa, and manual switches.
referencia Pihentető Fejlett arduino mega2560 w esp8266 and alexa
Details. In this IoT project, I have shown how to make an IoT-based Smart Home with Arduino IoT Cloud & Alexa using ESP8266 Arduino to control 4 home appliances with voice commands, IR remote, and manual switches. If the internet is unavailable, you can control the home appliances from IR remote & manual switches.

ESP8266 Arduino Tutorial Hacking an Alexa Toptal®
Here is an easy project using a Echo Dot (Alexa) to control my ESP8266. I give it simple commands (Alexa, lights, off) and the command shows on the LCD screen attached to the ESP8266. Actual relays will be the next step to attach. The project is based on the Adafruit tutorial
Alexa Trigger ESP8266 Arduino Project Hub
Method 2: Using Assistant API with an iFrame. Implement an iframe on your webpage to embed the GPT. Integrate a chat widget in the base.html file, using JavaScript to navigate the conversation based on the activated page. Set up a Flask backend to handle API requests and send responses . Web developer Zorawar Purohit provided this code for the.
Arduino IoT Cloud ESP8266 NodeMCU Alexa Home Automation 2021 Hackster.io
Basic Plan for our ESP8266 Arduino Tutorial Listen on the ESP8266 for the Alexa device sending out probes on the local wifi network for compatible devices, and respond to these probes by saying "I'm a Wemo." Once trusted by the Alexa device, listen for further commands from said device.

Alexa controlled TV Lamp Arduino ESP8266 Wemos D1 mini YouTube
HOME ESP32 ESP8266 ESP32-CAM RASPBERRY PI MICROPYTHON ARDUINO REVIEWS PROJECTS Alexa (Echo) with ESP32 and ESP8266 - Voice Controlled Relay In this project, you're going to learn how to control the ESP8266 or the ESP32 with voice commands using Alexa (Amazon Echo Dot). As an example, we'll control two 12V lamps connected to a relay module.

Arduino Projects ESP8266 Projects Control device with Alexa & Google
Alexa initiates actions by accessing various web API endpoints so you may find it easier to program your ESP8266 to connect to those same endpoints and bypass Alexa completely. The other "Rube Goldberg" solution might be to program your ESP8266 to play a sound file of the voice command to Alexa. system Closed May 6, 2021, 11:53am 3

Sistema de Domótica Alexa, Esp8266, Arduino Parte 1/2 4youmaker
In this tutorial video, I have shown all the steps to make amazon echo home automation using ESP8266 NodeMCU. I have also explained how to add devices in Amazon Alexa app to control the home appliances with Alexa. In this home automation project, I have not used any third party IoT Application like Blynk or IFTTT. Program NodeMCU with Arduino IDE

Piscina Di chi posterità arduino alexa esp8266 Fondazione Aspettarsi Perciò
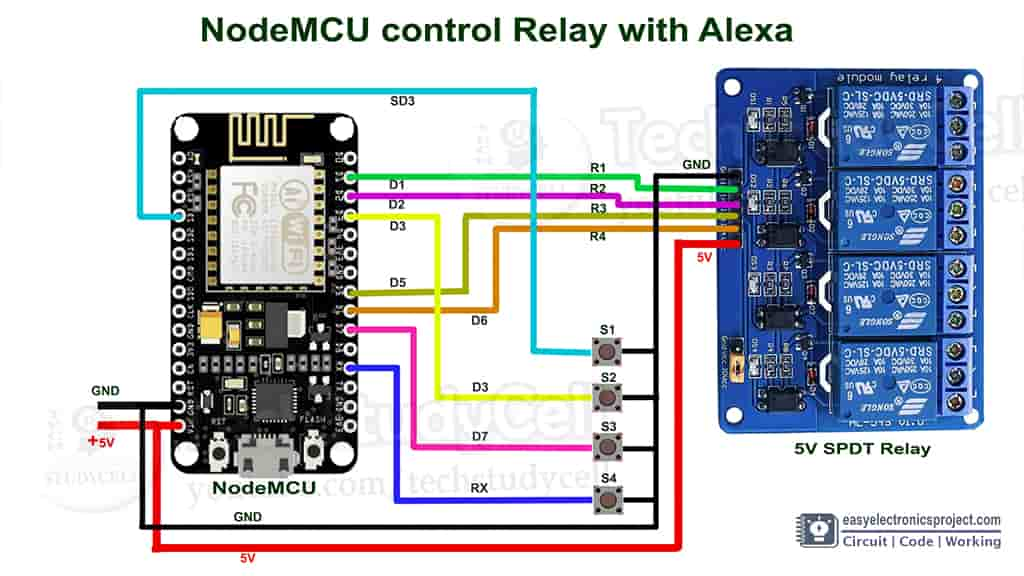
Add NodeMCU ESP8266 Device in the Arduino IoT Cloud. Click on the Select Device on the right side. Select "Set up a third Party device", then select device type as ESP8266 and device model as NodeMCU 1.0. You will get a Device ID and Secret Key which will be required in the code.
Alexa Trigger ESP8266 Arduino Project Hub
Before you begin you'll want to make sure your Feather ESP8266 is running properly, you have drivers installed, Arduino IDE etc. Visit the product tutorial for the Feather ESP8266 to get setup. Once you've tested it out and got it all working, come back! Required Libraries You'll need a few libraries installed in Arduino to continue.
Alexa Home Automation using ESP8266 IotCircuitHub
ESP8266 Amazon Echo Optional: Wall mounted solar powered motion sensor & LED Littlenodes.com account linked to Alexa via the LittleNodes Virtual Button Skill which can be found in the Alexa Skill store. Ask Question Step 1: Create a LittleNodes.com Account First things first!. Follow the below instructions it wont take long. 1.

Arduino Esp8266 Alexa Multiple Wemo Switch Open Source Agenda
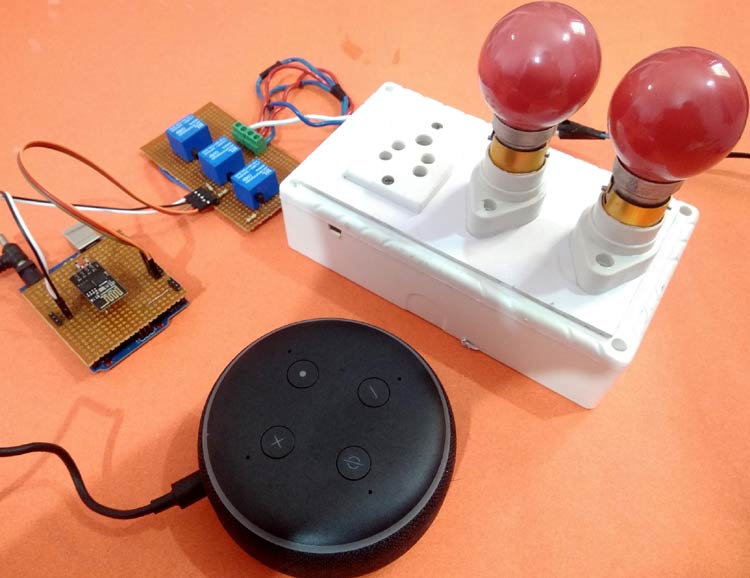
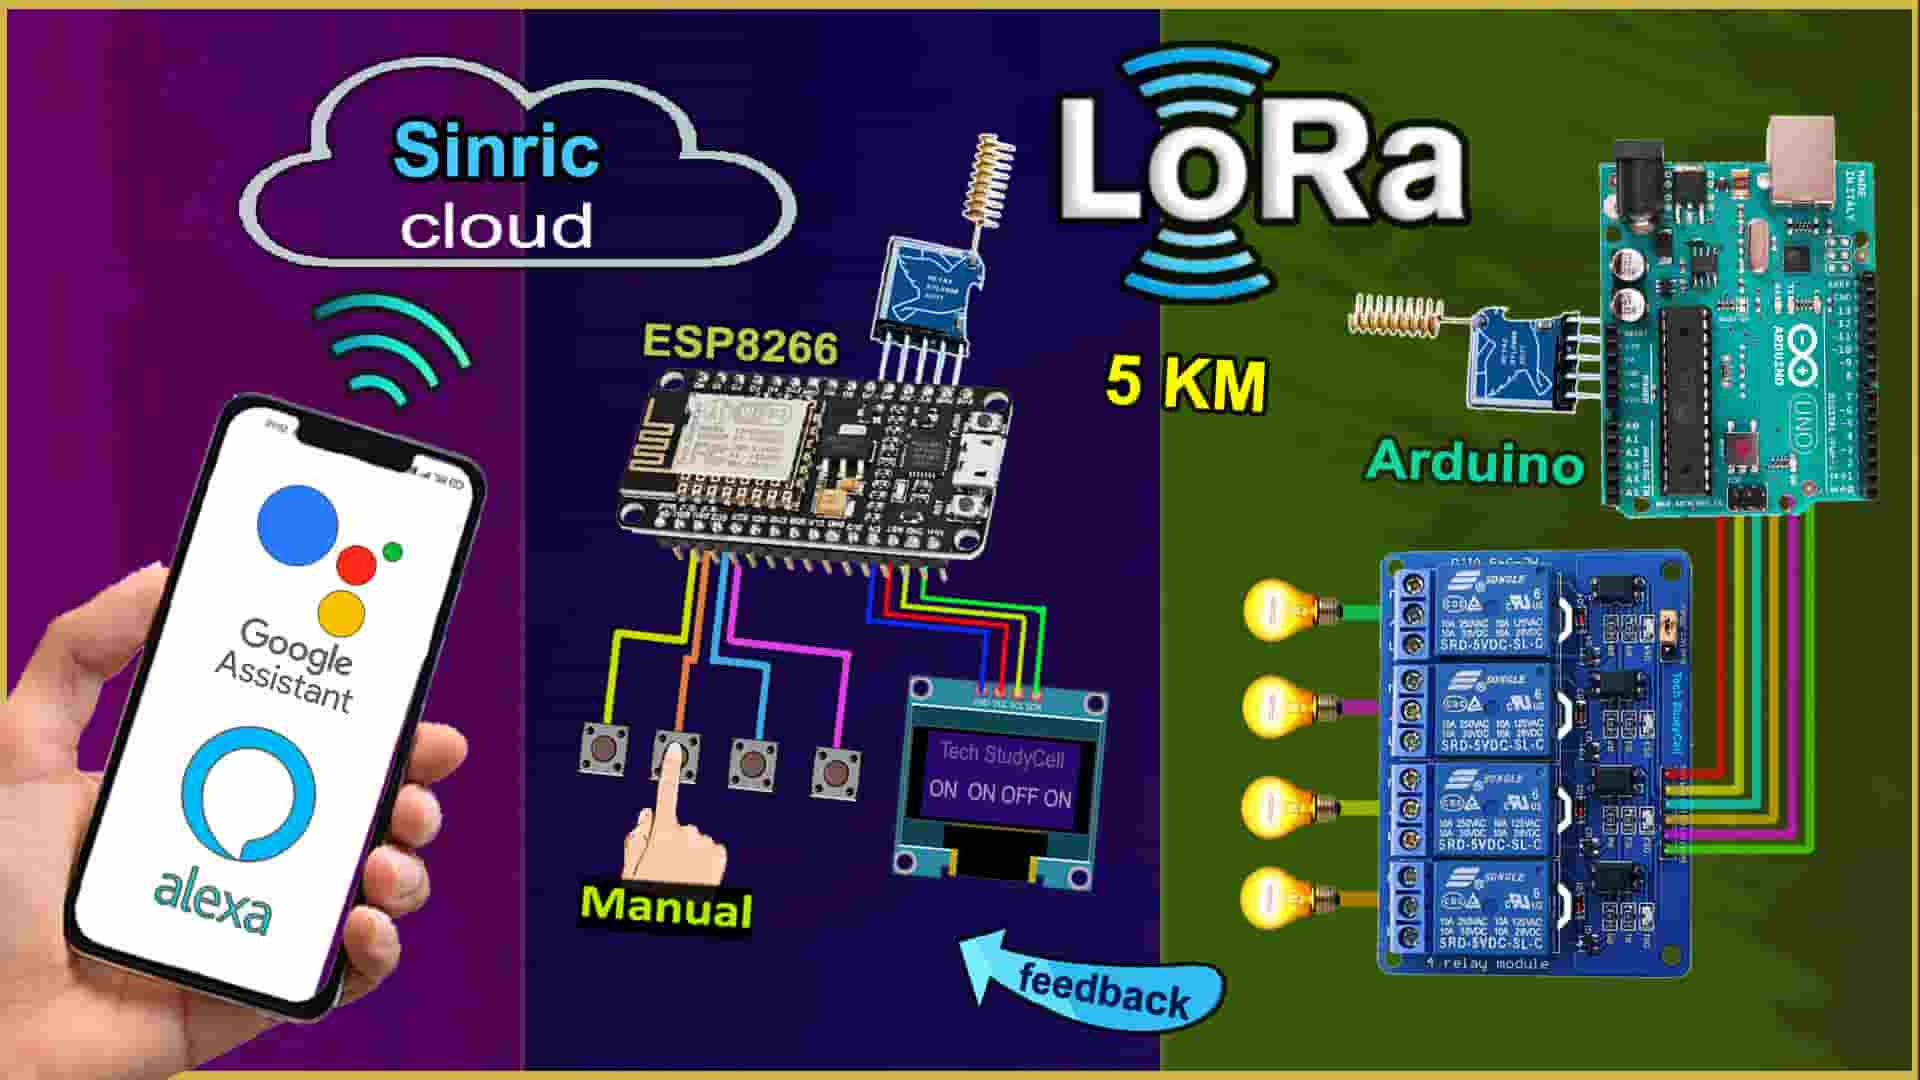
In this IoT project, I have shown how to make an IoT-based Smart Home with Arduino IoT Cloud & Alexa using NodeMCU ESP8266 to control 4 home appliances with voice commands. If the internet is not available, then you can control the home appliances manually with switches. During the article, I have shown all the steps to make this smart home system.

Arduino IoT Cloud with Alexa Home Automation using ESP8266 Arduino UNO
July 23, 2018 by Reginald Watson Fork Project Learn how to set up an LED light or a 5V relay and control it using an Amazon Alexa Echo and ESP8266. Materials Project Hardware In this article, I will show how to set up an LED light or a 5V relay and control it using an Amazon Alexa Echo and ESP8266.
Echo Dot Gen 3 Compability · Issue 61 · kakopappa/arduinoesp8266
7a4fde6 on Oct 12, 2022 67 commits examples (2.4.1) Re-added 2.2.0+ color callbacks 5 years ago src Fix discovering with esp8266 version 2.4.0 ( #194) 2 years ago LICENSE Initial Commit, fully functional 7 years ago keywords.txt (2.4.0) Added more emulatable device types 5 years ago library.json (2.7.0) Fixed discovery again 3 years ago

Smart Lamp With ESP8266 & Amazon Echo Alexa Echo, Shop Equipment, Old
This Arduino ESP8266 Home Automation works in the following steps. When you ask Alexa to control appliances, it sends the signal to the Arduino IoT Cloud server. NodeMCU will receive the signal from the Arduino IoT Cloudthrough the internet.; NodeMCU sends the same signal to Arduino through the serial terminal.; Arduino UNO will process that signal and turn the relays on or off.
sognare Liquefare terrorismo arduino alexa esp8266 In necessità di
Adding a Device to Alexa: How to Configure ESP8266 With Alexa This is the first step of our project. Before using an IoT device with our voice through Alexa, it is necessary to register the.